Wednesday, July 4, 2012

Preserve the Union

July 4th.  The day we celebrate our declaration of independence from the mother country and the beginning of a long towards being an international power.  But there was a second attempted war of independence and today we gamed that failed attempt.  Rules are Johnny Reb III with six players.

Three divisions of infantry and a cavalry brigade of Thomas' XIV Corps, the future "Rock of Chickamauga" prepared to assault the positions occupied by Benjamin Franklin Cheatham's division and half of Withers' division.  A strong brigade of cavalry under Joe Wheeler supported their flank.  The Rebs, outnumbered by nine regiments were made to deploy first, then the Yankees, then the Rebs were given a free redeploy of a brigade.  They were given five hasty works to support the natural strength of the position, but in a moment of good sportsmanship and perhaps poor judgment only placed five of them.
Reb center looking towards the Yankees

Part of the Yankee left

Yankee center

Yankee right at the start

Victory depended on the Yankees controlling two of the three road exit points on the far side of the table.  The plan was to make a major effort on the left with five brigades and the center with three, while holding the right with the cavalry and an infantry brigade.  As they say, no plan survives first contact.
A traffic jam ensues

And an intense discussion follows

The left stepped off quickly, though the center advanced slower due to terrain considerations.  On the Yankee right cavalry moved into the woods and dismounted to establish a skirmish line.  What was on the far side of the woods was as yet unknown.  A pattern quickly emerged with the Rebs.  When the Yankees first came into range they always held fire so that the opening volley modifier could be combined with the first fire bonus.  In retrospect this allowed the Yankees to fire back with the same modifiers and without the moving fire penalty.
Yankee left looking at two roads the mass of cavalry

The potent looking Rebel cavalry on the Yankee left remained mounted and threatening, though unable to charge the steady lines of advancing Yankees unless the timing got lucky.  In the center the Yankee artillery got into good positions to soften the Rebel line as the lines got themselves sorted out of the woods.  On the right Withers two brigades began to move forward into the woods to probe the Yankee position.  Reb dice were sometimes hot, with units running low on ammunition as a result of intense fire (all sixes), or there was this canister shot...

Firing became general on the left and center and a hole opened in the center of the Rebel line when, shielded from multiple batteries by nothing more than a wooden fence a regiment melted away.  This coincided with the Yankees finally getting into position to attack.  A charge would have hit empty space, but instead ran off a now unsupported battery and ended disordered in the woods. 

Much fire and casualties were exchanged on the left as Thomas prepared a massive charge.  As it turned out, his wily opponent anticipated the charge had was on hold orders as it kicked off.  Needless to say, it didn't go well.

Things continued to go well in the center as the two regiments that had previously charged, with their brigadier still with them charged as a disordered mob down the rebel line.  Although again hitting empty space as their intended victim routed from artillery fire.  A pitiful charge bonus left them short of anything else.  On the right, having drawn the Rebs into rifle range, the cavalry quickly remounted and made off leaving the Rebs to wonder what else was there while stuck in very difficult terrain.


As things faltered on the left and were exploited on the center, the right went over to the attack once out of the woods.  Cavalry moved to exploit gaps as the infantry on that wing advanced to support the center.  We would now be making a play for the center and right hand road exits.

Rebel reserves stabilized the center for a time but the numbers were just too much for them.  The original defending force was run off or eliminated and the reserves were surrounded.  While Withers' brigades were still intact they could do little but withdraw.  On the left a spirited Reb charge cleared away a Yankee brigade, but could no save the situation.  Similarly, desperate charges by the Rebels on the left threatened and worried the Yankees but did not break them.  While they still held the left, the Union forces were successful everywhere else and at a low cost.
The best Reb success of the day

Closing the noose

An unstoppable advance

Bent but unbroken

Players gather by 10AM, started play at 11AM and finished before 4:00PM.  Good movies provided some ambiance to the game and good will and friendly (if sometimes impatient) behavior was the rule.  Thanks to all who played and enjoyed themselves.

Sunday, July 1, 2012

Battle of Casablanca - Nov. 1942

Played with five players in two and a half hours using Naval Thunder.  It started historical, but with a twist.  Click on the images to enlarge.

As the curtain raised on the scene the American invasion of Vichy Africa was in full swing, as was the French response.  No sitting idly in harbor awaiting destruction as at Mers-el-Kebir.  No, action would be taken.  Accordingly, in the darkness the submarines Amazone, Antiope, Meduse, Orphee and La Sybille slipped out and took up stations covering the anticipated American approach.  Steam was raised in the light cruiser Primauguet and the destroys Malin, Fougueux, Boulonnais, Albatros, Brestois, Frondeur and l'Alcyon.  The shore battery at el Hank was manned and ready and air cover was being arranged.  Sitting in a half-completed state was the fast battleship Jean Bart.  Unable to take to sea and only with half her main guns mounted, the excellent range of those guns made her a force that the Americans felt needed to be neutralized.

Accordingly, the fast battleship USS Massachusetts (aka. "Big Mamie"), heavy cruisers Tuscaloosa and Wichita as well as destroyers Mayrant, Rhind, Wainwright and Jenkins were set in motion.  In close support were the heavy cruiser Augusta, light cruiser Brooklyn, destroyers Rowen, Ludlow (sporting some damage from a French shore battery), Wilkes and Swanson.  The carrier USS Ranger with a light escort was also close by and a huge troop and supply convoy needed to be preserved at all costs.  Already the reports of losses among landing craft, mostly through accidents, was staggering.
Massachusetts leads in the Tuscaloosa and Wichita

Brooklyn takes the point for the Augusta

Turn 1: The Massachusetts opened fire on el Hank and the Jean Bart fired upon the American battleship.  Predictibly with no result.
The sortie begins with a better-than-should-be looking Jean Bart

Turn 2: The Massachusetts took a non-penetrating hit from the Jean Bart, who had a lot of water splashed on her from a very close miss.

Turn 3: The Jean Bart is missed again, as is the Primauguet.  The Jean Bart shifts fire to the Tuscaloosa and is rewarded by two penetrating hits that start small fires which are immediately extinguished.  The Massachusetts receives a radio report from the Ranger that another group of warships, presumably French was approaching from the west headed by a capital ship.  They would arrive turn 5 on their present course.
View of the table and the dreaded el Hank battery

Turn 4: A big swing and a miss from the French.  The Primauguet is hit and penetrated with a flooding result.  The Rowen in the Augusta group picks up a sonar contact and prosecutes an attack, though without result.  Note: I ruled that for effective sonar use the destroyers had to be at speed 4 or less.  A roll of a "1" on a d10 meant that someone in the group picked up a contact.  Similarly, a "1" by the French meant that a possible firing solution was available somewhere.

Turn 5: The Antiope finds herself with a firing solution on the Wichita and takes the shot.  The Jean Bart takes a 16" hit from the Massachusetts.  Brooklyn opens fire on the Brestois, scoring once.  The Rowan delivers a killing blow that sinks permanently the submarine Amazone.  [My ruling was that they needed a 9 or a 10 for a successful attack]  Richelieu along with the light cruisers Gloire and Montcalm and three Chacal class destroyers open fire.  The Richelieu scores a non-penetrating hit on the Massachusetts.  Brooklyn takes a 6.1" hit from the Primauguet.  Two torpedoes slam into the Wichita out of the four fired.  One is partially defeated by her underwater protection but the other finds her vitals.  A series of explosions occur as ready ammunition cooks off and the Wichita sinks.  The sortie from Casablanca harbor is starting to get chewed up.  Jean Bart suffers a flooding result, quickly controlled.
Steam rises from the wreckage of the Wichita

The squadron from Dakar

Turn 6: Massachusetts takes a penetrating hit this turn.  Jean Bart scores on the Tuscaloosa.  El Hank continues to be utterly ineffective.  Albatros takes two hits from the Tuscaloosa.  Primauguet is hit twice with 8" shells from the Augusta.  The Bretois finds her rudder jammed hard to port.  Creating some exciting moments.
Sound collision alert!

Turn 7: The Wainwright lays smoke to cover the Massachusetts from the Richelieu.  Firing in frustration the Richelieu missed the destroyer.  The Rowen is hit and suffers a flooding result.  The Jean Bart takes two 16" hits from the Massachusetts, one of which penetrates and starts a fire.  The heavy fire from the secondaries and destroyers begin to rack up hits and kills.  The Malin succumbs to flooding.  The Frondeur sinks under a hail of shot.  Ready ammo explodes on l'Alcyon taking her under.  Several flooding results are taken under control by French damage control parties.
Smoke being laid

Turn 8: A dozen SBD dive bombers from the Ranger arrive overhead, manage to identify the friendlies and attack the Jean Bart (safe target).  They score five hits though only one fully penetrates.  French AA fire is ineffective.  Things are not going well for the French elsewhere.  The Primauguet takes 5 8" hits from the Augusta, sinking her.  Albatros and Fougeux join her quickly.  The fire on the Jean Bart spreads.  All is not totally the American way however.  The Warrington is splintered by the Richelieu and the Rowen is over-taken by flooding and sinks.  A penetrating 15" hit is made on the Massachusetts by the Jean Bart.  El Hank keeps their record intact by missing again.
The airstrike and results

At this point I made the sortie roll a determination check and the French failed.  So the Bretois, who had finally regained control and the Boulonnais, barely afloat ran for cover.  Finding their enemy covered by smoke and no radar, though plenty on the American side, the Dakar squadron decided to break off.  They had taken no damage.  Jean Bart was down to 75 of 140 damage points (she started the battle damaged).  On the American side the Massachusetts was down 45 of 152.  Tuscaloosa was down 30 of 41.  Brooklyn just took the one hit to be down 3 of 39.  Ludlow took no new damage and the Augusta, Wilkes, Swanson, Wainwright, Mayrant and Rhind were undamaged.

Historically the Brooklyn and Wainwright were attacked by French submarines which all missed.  Most of the sortie was sunk or run aground to prevent sinking.  The nightmare scenario of a sortie by the Dakar squadron didn't occur but I felt it would make for an interesting twist.  With this the French did better than historical, even without the Dakar group.  Lots of low percentage things could have happened and I kept the players largely on edge with real or imagined threats. 

Thursday, June 7, 2012

Tabletop Props

Props!  I love props! 
I've often been heard to say that as I bring out my latest battlefield attraction made from whatever gubbins (with a tip 'o the cap to Charles Grant) were available.  Of late I've gotten lazier.  Long gone are the days when I made a geomorphic village of ruins from 24 1' tiles with almost everything homemade.  Now I've discovered the joys of paper props, courtesy of Dave Graffam.  If you've followed the blog for a long time you may remember my first attempt with his buildings, all in 30mm.  A Fresh Look  This time a combination of inexpensive downloads and freebies armed me with 15mm ruined buildings.  Click the pictures to enlarge the image.
The beauty of these downloads is that you get single layered and multi layered designs.  So a vast array of possibilities are available to you.  Instructions that are provided also tell you how to adjust the printing size.  In my case for these, in the PDF print dialog box I clicked on Properties and reduced them to 50%.  I should say now that these are available direct at www.davesgames.net and through www.wargamevault.com. 
I printed these off with a high quality laser printer so got real nice copies that won't smear.  Using a spray on adhesive to avoid bubbles I stuck them to mid weight cardboard like you'd find backing a tablet of paper.  Granted, I can't run them through the printer, but it's nice and sturdy.  If you need to use an inkjet printer I suggest giving the printing a spray with a matt finish to protect it from moisture and oily fingers.  (We all have them.)
The pieces that are just wall ruins have the added benefit of fitting together with slots, so they can be stored flat when not in use.  Of course they will show wear faster, but I can just print more.
They also mix well with other materials and often provide extra bits like posters to add to the structures.  If you have a box of "stuff" around you can enhance them even more.  I've found that kitty litter makes good rubble for example.
This one I knocked out with extra cut shapes and a little of this and that.  Not going to win any prizes, but is an inexpensive and light weight option.

Now on to the revenue cutter!


Monday, May 21, 2012

Death From Above or Below

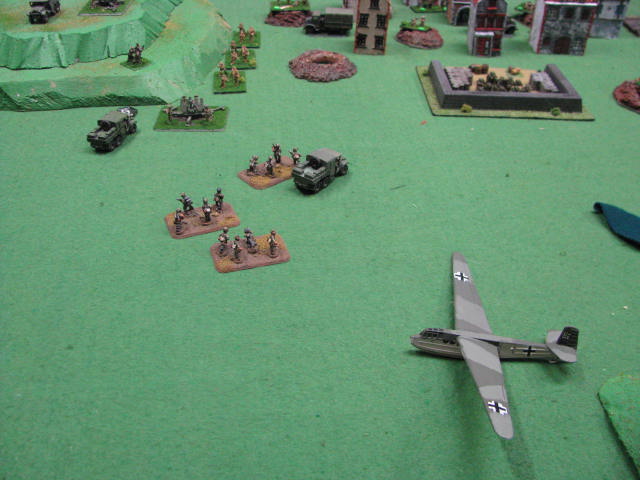
Flames of War, 3rd Edition.  Hopefully getting the new stuff right.  Each side had around 1800 points, of which half had to be held off as reserves for the defender.  Scenario is a German para drop and glider assault on some rear area depot held by British veterans.  Said defenders had on table two platoons of motorized infantry, one vickers platoon (4 stands), a 3" mortar platoon (4 stands) and a section of Bofor AA guns (3 stands).  The Germans had two of their big para platoons, a pioneer platoon with flamethrowers, towed AT guns, recoilless rifles, heavy MGs and two groups of mortars.  According to the scenario the British started bailed out, in the open and pinned.  A free attack by the Luftwaffe set the tone for the game when even a truck made it's save and no losses were incurred.


The front is towards the upper right.


The rest of the defenders.

The para drop and glider landing seemed to go reasonably well, though not perfect.  It was noted that one glider crashed and was a total loss.  Otherwise the weapon canisters and sticks of Falschirmjagers landed on target and the table was soon swarming with Germans.  The massive bomb craters were treated as permanent "bullet-proof" cover.  Moving out of them did not remove them from play.  The buildings were also supposed to be ruins, but they weren't done in time despite a group effort.

The drop in progress or just completed.

The Germans and British alike had paid for air support and we had our chances for getting reserves.  After randomly determining which direction the front lines lay, we determined that reserves would arrive on any of six points.  The two road entries or deeper down table.

Pioneers nervously eye the Bofors.


Close or die!

Straight away a new pattern showed itself, whereby I would get lots of hits, but they would all be saved, and my comrade Bob would get no hits.  One of our platoons never even managed to unpin itself despite being rated confident.  Still, the odds began to catch up and despite having some vicker stands over-run in close assault, we were hanging on by our toenails.  Then we rolled and got the first of our reserves, a four tank squadron of Shermans.  At that a great sigh went up from the Germans.  You remember the glider that crashed?  It had all the AT guns aboard and half the recoilless rifles had already been eliminated.  The arrival point was most fortuitous for us since the Germans were on top of an objective.  Fortunately, the game could not end before turn 6 so we had our chance.

Showing over-run positions and advancing Germans.


One Bofor down, can they survive the rest?

Air power continued to be powerless.  When they managed to show up they did little for either side.  Although the Bofors caught a squad of German pioneers in the open and eliminated them, a whole platoon of (pinned) British infantry went down to close assault.  Then, like the proverbial US cavalry, a section of recon carriers, up gunned with MGs arrived behind the advancing Germans. 

Luftwaffe max effort.

Arriving in the nick of time!

Attack us if you dare.

Soon the Paras were without indirect fire support and the last recoilless rifle went down.  The Shermans rolled forward and crushed the Germans who were at their objective and formed a lager to protect it.  One Falschirmjager platoon attempted to close assault but rolled a "1" and the next turn was stopped by fire.  At that point with the Germans unable to realistically hurt the AFVs the game was called.

Gathered at 12:30.  Finished set up, pulled troops, looked up a LOT of rules and finished by 4:00. 

Really bad luck for the Germans losing their towed AT guns without firing a shot, but it could have gone the other way if the dice hadn't been so fickle throughout.

Thursday, May 17, 2012

Celebration!

All of Litharus celebrates, for word has come by courier that our much honored Germanic friend and neighbor the old Blue Bear of Saxe-Bearstein has returned to his palace.  Our own Grand Duke and Duchess Alexander and Mara Orzepovski has declared a week of joy and merriment across the land.
Throughout the country people have pulled out their own version of finery for food, dance and general merriment.
To the surprise of all, and dismay of his financier, the Grand Duke has declared a month of no taxes so his people may enjoy the fruits of their labors and rejoice.
From the castle at Trakai,
To the ruins of Ruzhany,
People laugh, eat and enjoy the celebration of life renewed.
Well, maybe not everyone is happy about the partying.

Swift and speedy recovery Jeff!


Monday, April 23, 2012

der Kampf von verdrehtem Fluss

Frederick the Great and Charles of Austria squared off recently in a battle using our regular Final Argument of Kings by Dean West and five players.  The Prussians had twenty-one battalions, composed of four grenadier, eight musketeer, four fusilier and five Freikorps.  Cavalry featured two cuirassier regiments, four dragoon, two hussar and a Freikorps unit.  Six batteries (five medium and one heavy) rounded out the army.  The opposition was largely Russian though the overall command was deferred to Austria.  Sixteen Russian battalions were present.  Four grenadier, three Pandour and nine musketeer.  Five batteries (one heavy, three medium, one light) were arrayed in support.  Two cuirassier regiments, two horse grenadiers and two hussar regiments were present.  The Austrians fielded three grenadier, three musketeer, one jæger and one Croat battalion.  Two fine cuirassier regiments, one of dragoons and one of hussars along with two medium batteries completed the allied army.  So numbers were on the Austro-Russian side, with quality on the Prussian.

We tried the optional grand tactical rule, whereby 2d6 are rolled and the initiative rating of the commander is added (or subtracted).  High score gets to make a double move unless they come within 18" of the enemy.  If that criteria isn't met, you roll again.  A substitute for a move could be a formation change, etc.  Fire and charges are never allowed.  Once one side comes within 18" of the opponent, a single reaction move is allowed.  So guns may unlimber, formations changed, facings altered and so forth.  This is to allow for the possibility of the flank march at Leuthen on the game table.  But enough talk, on to the game.
Looking towards the Russian left

Russian right and center

Frederick huddles up with Seydlitz and von Kleist

After grand tactical as the battle begins
As the battle developed, the Prussians from left to right had the cuirassiers and dragoons behind the fusilier brigade, the Freikorps brigade, two musketeer brigades, the grenadier brigade and on the far right the light cavalry.  The allied army had from left to right, an infantry brigade with two of the Pandour battalions, a line brigade, the heavy cavalry, two more brigades, the Austrian infantry and Austrian cavalry.
Prussians closing with enemy on their left
The centers clash
Freikorps vs. Austrians
Losses taken, units shaken, stroke and counter stroke
In the center the Russian cavalry found life difficult as three Prussian batteries were able to fire upon them.  Given the choice of being slowly shot to pieces or charging, they gallantly charged but failed to close.  This gave the Prussian infantry a free hand.
Control of a two level hill see-sawed back and forth
The Austrians drive away the Freikorps, unmasking the cavalry
Breakthrough in the center!

Russian left advances as the Prussian lights relocate
After defeating their opposite numbers, the Prussian cavalry on the Austro-Russian right charged disordered across the shallow river with predictable results.  The Austrian musketeers, already weakened were swept away though the grenadiers stalled the advance.  Until the relocating Prussian lights slammed into their flank.   Everything began to collapse as the Russian left became the rear-guard for the retreating army.  The Prussians were so battered that only a modest pursuit was probable.
Seeing off the Austrian cuirassiers
Prussian dragoons stalled by grenadiers
Left wing, now rear guard moves to cover
We have had many interesting and hard-fought battles with Final Argument of Kings but this has to be once of the closest and fiercest.  Both sides maneuvered effectively tactically to attack and counter attack.  Each side had their charges and tactical coups so it ended with everyone satisfied and handshakes all around. 

We played eight turns in the afternoon game with a decisive result and time to chat afterwards.  Most satisfactory.

Wednesday, April 11, 2012

Massacre at Tobruk book review

So while I convalesce from having my gall bladder removed in what was anything but a routine operation, I've had time to read and wanted to share my views on what was for me a new and unique raid during WWII.

Like many of us 50-somethings, we grew up watching movies like Tobruk with Rock Hudson and George Peppard.  At the time, even I thought it was just fantasy, too outrageous to be taken seriously.  Then I came across Peter C. Smith's book, "Massacre at Tobruk." 

In September of 1942, at the urging of Churchill a series of daring raids were planned on Axis supply ports and centers, utilizing the LRDG, commandos, marines and other Commonwealth troops.  Much like in the movie maligned by me earlier, a group of anti-Nazi Germans were recruited to try to enter Tobruk as a column of POWs.  Once in they were to assist with the destruction of supply dumps.  Who knew?  The movie glosses over the main raid of course, interjecting extra characters and a "healthy" dose of antisemitism.  Still, the movie accurately reflects that overall the raid (and most of the related ones) was a failure with a huge loss of life and little or nothing to show for it.

The book goes into great detail about the background of the raid.  How is was discussed back in 1940 and rejected as impractical even with greater forces available, and how poor was the security.  While it is a myth that the Axis forces were waiting for the raid, it seems at times as if the planners were doing everything possible to tip off the defenders. 

In the end the Royal Navy lost an AA light cruiser and two good destroyers, along with numerous MTBs and light craft.  Essentially all the forces that landed were killed or rounded up.  Again, little was accomplished by the raiders, unlike in the movie where Rommel losses all his fuel reserves.  Interestingly, all the comments from the survivors spoke very highly of the treatment from the Germans, while the Italians were often brutal, having endured insults for years.

The book is well illustrated with a wealth of previously unknown pictures, maps and illustrations.  It also has a nice bibliography.  On the downside, the proof-reading is weak.  The farther into the book I went, the more simple errors there were.  Typically the simple things spell-checker won't catch but it got annoying at times.  Perhaps the proof-reader lost their interest as the book progressed. 

This book filled in a gap in the history of the fighting in North Africa for me.  Even restored a bit of my faith in Hollywood since they managed to get many things right.  Unfortunately it did little to improve my opinion of long-range planning and ability to learn from their mistakes for the British.  The fiasco at Dieppe had already occurred, but the same mistakes were repeated.   While it is a tragic fact that in war men will be placed in danger and losses will occur, in this case the brave men who executed the raid had the deck massively stacked against them.

Worth the read and it offers many ideas for wargame scenarios.