Sunday, August 7, 2022

Medlinburg River Crossing - Empire Napoleonics

Our imbalanced scenario today sees a reinforced French rear-guard corps attempting to escape encirclement by the allied armies.  The game is loosely based on the events at Leipzig in 1813 and the subsequent retreat.  As such, II Corps and attachments must cross two rivers and pass over the 11.5' table.  The French and Swiss under Marshal Oudinot will be opposed by Prussians, Austrians, Swedes and Russians.  The scenario, originally published in Wargames Digest allows each side to field a corps from 1809-1813.  Some house rules were in effect but essentially it was Empire (V) at it's best.

This is a long report with lots of pictures.  Click on the images to enlarge them  Comments welcomed.

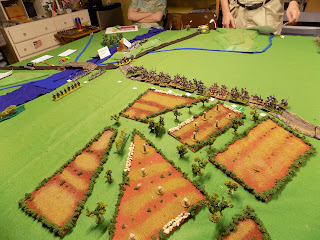
After the first "Grand Tactical" move, the French have all their cavalry leading, looking towards the distant bridge.

Which is guarded by a Young Guard brigade, Old Guard heavy battery, and two excellent cavalry regiments.  A walled Benedictine monestary sits on one flank.  Both rivers cannot be forded, though the main body has a pontoon train with two bridges loaded.

Utilizing the road bonus, the French cavalry races for sanctuary past the autumn fields and the far bank.  But the Coalition forces have not been idle.

The Swedish contingent emerges through the orchard on the French right as a pontoon bridge goes up, and a Prussian brigade appears on their left.  Maybe that cavalry will be needed?

A small Russian corps (aren't they all?) arrives in the middle of the table, ready to fight.  With everyone.  The Russian commander had to be repeatedly reminded that the Prussians were on his side.  Today.

A Prussian infantry brigade/division rumbles into action, unable to fully clear the bridge initially.

The Swiss "Red" division moves to engage the Swedes while a French division fans out and the Swedes take the middle ground opposing them all.  The French cavalry is recalled.

But the Russians cut them off and engage them all along their line, even siezing a walled farm complex that was unattended.

In the following hour the Austians belatedly arrive to attempt to cut off the retreat.  The French Guard elements take up position to contest the attack.

Charge after charge are resolved in the center with honors even.  Though some of the results are decidedly unexpected.  The French cavalry will not be riding to the rescue though.

The Prussian brigade finally clears the bridge and starts to advance.  The French, perhaps not appreciating the gravity of the situation adopt a defensive posture rather than trying to brush aside the Prussian line and Landwehr.

The massive cavalry scrum continues in the center with the French slowly yielding some ground.

The Austrians prepare an enormous wave assault in column against the Guards holding the area around the monestory.  

The French, satisfied with their formations, beginning to push out from the bridgehead, though Swedish lines and Prussian columns with artillery support await.  Time is not on the side of the French.

The clear understanding was that any French forces that did not exit the table would be considered captured or eliminated, so it was critical for them to open an escape path early.

The Swedish and Russian cavalry begin to converge on the crossroads and make it even more unlikely that the cavalry will link up with the main body again.

A third Prussian brigade comes on table, rich with cavalry and a grenadier brigade.  The jaws of the trap are fully beginning to close.  Back at the orchard, the Swiss are mangling the Swedish infantry, but it won't matter if the road is closed.

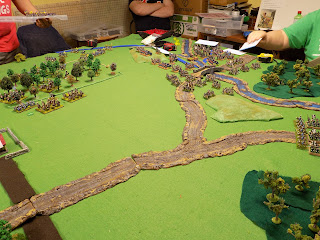
Looking at a bigger picture, the French are jammed up at the original bridge and cannot even deploy their superior infantry against the blockaders.

Incredibly, with a small percentile chance, the Austrian waves roll over the defenders and evict the French Guard from the monestary.  The bridge across the Medlinburg River starts to get congested and the French cavalry is starting to find the far bank appealing.

The "Swiss", shown here with Danish proxies, are on a roll, but will it matter?

The French infantry has hardly advanced, which is not really surprising.  With the huge number of cavalry charges to resolve we didn't get in many hourly rounds of play in the many hours we were together.

The French cavalry, seeing no way of joining up with II Corps, made to exit the field of play.  The Austrians were undoubtedly going to cut the bridge once the cavalry was gone and the Russians would set up another layer to trap the French against the main army abstractly pursuing.

This is the third time for this scenario.  In the first the French, with a lot of luck, won a major victory.  In the second, passive allied players made it an easy win for the French.  This time, by not using their excellent cavalry to keep a corridor open, the French were cut off and all the infantry bagged.  Finally, despite mentioning it in the briefing, no call for reinforcements was made.  So the Vistula Legion infantry and uhlans never came to help hold the Medinburg bridge open.

Still, lots of drama on the tabletop and the tabletop debut of the Prussian, Swedish and Danish (Swiss proxy) contingents with the main gaming group.  Thanks for reading it to the end.


Wednesday, August 3, 2022

Cottonclads vs. Ironclads

Some time ago the naval might of the United States and Confederate States squared off in a fictional battle very loosely based on Plum Point in 1862.  Since I didn't have the exact ships involved it was scaled down a bit and substitutions made.

Rules were the excellent Steam and Black Powder as authored by the late Neil Stokes of the Saint Paul Irregulars.  They are easy to pick up and the result feels historic.  More importantly, you can get to a result in one session!  Models are a combination of Thoroughbred Miniatures and scratch-builts, in 1/600 scale.

Click to enlarge the pictures, comments and additions or corrections are always welcome.

Looking down river and with the benefit of the current, steam the rams Governor Moore, General Earl van Dorn, General Beauregard and Colonel Lovell, lead by the ironclad ram Arkansas at the point.

They sail past a rebel held community with gun batteries and infantry protecting it.  

Opposing them and simply trying to hold position against the current, are the ironclad gunboats Essex, Benton and Cairo.  This being a surprise attack, their starting speed was just matching the current.

Historically, the Confederates emerged from the morning mist and were on the ironclads so fast most only had time for a single shot before ramming attempts were made.  In our case the cover lifted early so the Yankees could start working up to speed.

Splitting their force to navigate around a small island, the Rebs and Yankees began exchanging ineffective fire.  The two rams closest in the picture were not happy with the development.

But attempts had to be made!  A ramming attempt glanced off the Benton as the next tried to set up his run.  The large Yankee guns began punching holes in the "cottonclads."

The Earl van Dorn came sweeping around the island, took a full broadside in passing from the Benton and was raked by the Cairo, catching fire.  More glancing ram attempts were made, but bow to bow has a low productivity.  


The Governor Moore had better luck against the Essex, but was punished in return.  Looks like the Arkansas has a perfect ram attempt lined up.... right?

Wrong! A hit to the wheelhouse left her repeating her previous move, turning away from a dream shot.  Meanwhile, the van Dorn succumbed to flooding and fire and sank.  Now it was the turn of the Col. Lovell to burn.

But her misery was short-lived as the still turning Arkansas cut her in half.  Note the turn arc shown.  Vessels have variable turn arcs depending on size and speed and the rules have a nifty chart for pro-rating the simultaneous movement based on your speed.

Unfortunately I dropped the ball on more pictures.  Here we see the General Beauregard burning and eventually sinking.  The Benton suddenly fell victim to the chip-chip-chip effect or glancing rams and gunfire.  The Essex is off camera in a sinking condition.  The Cairo will likely escape, as will the "tinclad" that sailed on to support the ironclads.

Although the River Defense Fleet could hardly bear to lose any ships, the blockading squadron had been driven off with major losses and the Arkansas survived to fight another day.  So the lose of three cottonclad rams was acceptable.

I'm looking to do the full version of Plum Point at a convention this year.  To that effect the General Sumpter, General Sterling Price, General Bragg and Little Rebel are in progress.  The additional "Pook" ironclads are covered.

Thanks for looking.