As part of our on-going mini-campaign based on Charles Grant's book "The Annexation of Chiraz" we find that following the successful forcing of the
Pilica River, the Latverian army with its cohorts from Prochistan advanced in two columns. Seeing the need to seize the critical Vistula River crossings, one column advanced on the town of Pulawy which has four bridges. The local militia and a squadron of hussars took up arms to oppose them and hope for the swift arrival of Rondovian and Litharusian forces.
Rules are
"Batailles de l'Ancien Regimes" or BAR for short, figure ratio is 10:1 and action is card driven for movement and firing. Most battalions are 60 figures in three ranks with specialty troops being 30. Cavalry squadrons are typically 12 figures. Game on!
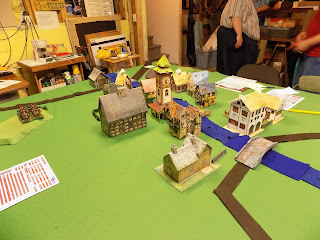 |
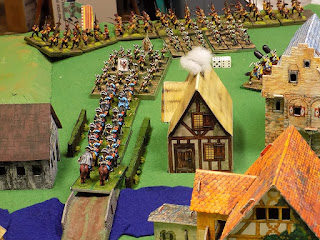
| "When the sun comes up on a sleepy little town...." |
 |
| The militia battalion defends the buildings and wall of the NE corner. |
In the campaign games we dice for the morale of militia. On a d6 a roll of 1-3 means they are poor, 4-5 is regular and a 6 indicates particularly motivated men. In our first victory of sorts, the roll for the militia was a 6. Veterans!
 |
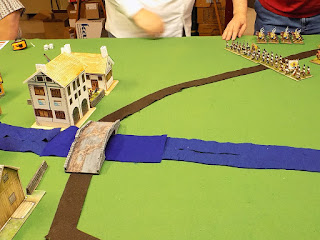
Each opposing army marched on table from parallel corners. So
order of march was critical. |
 |
| Going to take a long time to get everyone on board. |
The Litharusian army led with the Palanga Dragoons, followed by the Dainava Forest Jagers and the Vilnius Grenadiers. The Latverians had grenadiers leading, followed by cuirassiers and light infantry, the notorious "Grey Foxes."
 |
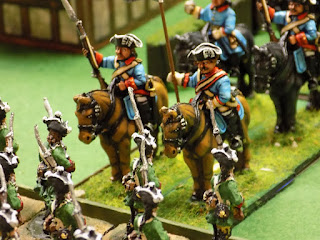
Hussars advance to delay the Latverians and find themselves
in a no-win situation. The survivors would eventually surrender. |
 |
A view from the Latverian side. The Duke of Alten's regiment
in the foreground. |
 |
The Vilnius Grenadiers begin to decimate their opposite number,
while the rest march on. |
 |
| Austria supports Latveria and bleeds for their allegiance. |
 |
The Latverian gun is silenced and soon the grenadiers will run
away. Meanwhile Vilnius was making spectacular saves. |
 |
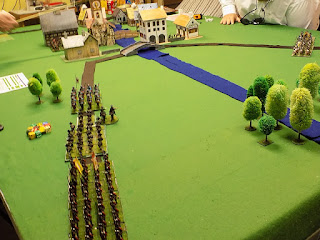
| Okay, we're at the bridge, now what? |
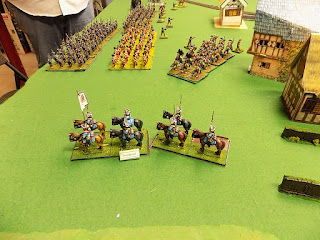
Farther down table the Latverians had been pushing hard to reach the other two bridges. Only the Palanga Dragoons, who had been riding hard through town could delay them. Deploy and wait for them to cross, or charge on a narrow front? Charge!
 |
| Galloping forward before receiving fire and hitting the column. |
 |
| Both sides thinking, "What are they doing?" |
 |
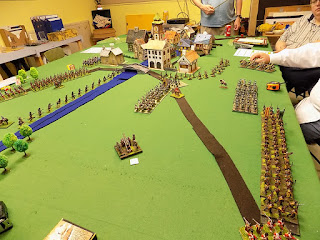
| Grand view of the situation before the charge is resolved. |
With both sides fully on table now, the charge remained to be resolved. Maxing out on modifiers the Loudon Freikorps cut loose and rolled a 3 on 2d6 (high is good). Three of twelve dragoons fell, but the rest pressed on. In the melee the dragoons held the advantage and the green-coats fell back, tested morale and routed. The dragoons didn't have to pursue but are left in the midst of the enemy.
 |
| "Okay, we won. Now what?" |
At this point, having completed nine turns we adjourned to the back yard for burgers and brats on the grill. The food, conversation and camaraderie was such that we never got back to the game. Hence the Part I in the title. We will resume the conflict (I have the luxury of being able to leave it up) this week. Stay tuned for Part II. Two Austrian battalions have routed and left, the only artillery is gone and the Grey Foxes are nearly at half-strength. The allies have lost a hussar squadron and over half of the jagers. Depending on who gets the action cards, the dragoons may not be around long either. Drama abounds!


Love the big units and your card buildings have lots of character, thanks for showing it .
ReplyDeleteChris
http://notjustoldschool.blogspot.co.uk/
thanks
ReplyDeletegclub
Very enjoyable report. I look forward to the rest.
ReplyDelete